Pipeline config
A Pimlico pipeline, as read from a config file (pimlico.core.config.PipelineConfig) contains all the
information about the pipeline being processed and provides access to specific modules in it. A config file
looks much like a standard .ini file, with sections headed by [section_name] headings, containing key-value
parameters of the form key=value.
Each section, except for vars and pipeline, defines a module instance in the pipeline. Some of these can
be executed, others act as filters on the outputs of other modules, or input readers.
Module instances
The main components of a pipeline config file are sections defining module instances. They load a module of a particular type, giving a set of options controlling what it does and specifying inputs, connecting it up to the outputs from previous modules.
Each section that defines a module has a type parameter. Usually, this is a fully-qualified Python package
name that leads to the module type’s Python code (that package containing the info Python module).
A typical module instance section looks like this:
[mymodule]
type=pimlico.modules.corpora.subset
input_corpus=corpus_module.some_output
size=100
Here the subset module is instantiated, with the option
size=100, specifying how big a subset to create. This module takes a single input,
called corpus, which is here connected to the output of a previous module instance.
Inputs are connected using parameters of the form input_<input-name>. They give
the name of a previous module instance and, optionally, the name of the output of that
module that we will get input from. (If not specified, the module’s default output
will be used.)
The documentation for each module gives details of:
- what options it can take, including their types and default values
- what inputs it takes and their datatypes
- what outputs it produces and their datatypes.
A large set of module types for different tasks, ranging from simple dataset manipulation to
advanced natual language processing or machine learning tasks, comes built into Pimlico and
each is fully documented.
Many of the core modules are associated with test pipelines, which serve both as unit tests for the module and examples of how it can be used.
A special type of module is alias.
This simply defines a module alias – an alternative name for an already defined module. It
should have exactly one other parameter, input, specifying the name of the module we’re aliasing.
Special sections
- vars:
May contain any variable definitions, to be used later on in the pipeline. Further down, expressions like
%(varname)swill be expanded into the value assigned tovarnamein the vars section.
- pipeline:
Main pipeline-wide configuration. The following options are required for every pipeline:
name: a single-word name for the pipeline, used to determine where files are storedrelease: the release of Pimlico for which the config file was written. It is considered compatible with later minor versions of the same major release, but not with later major releases. Typically, a user receiving the pipeline config will get hold of an appropriate version of the Pimlico codebase to run it with.
Other optional settings:
python_path: a path or paths, relative to the directory containing the config file, in which Python modules/packages used by the pipeline can be found. Typically, a config file is distributed with a directory of Python code providing extra modules, datatypes, etc. Multiple paths are separated by colons (:).
Special variable substitutions
Certain variable substitutions are always available, in addition to those defined in vars sections.
Use them anywhere in your config file with an expression like %(varname)s (note the s at the end).
pimlico_root:- Root directory of Pimlico, usually the directory
pimlico/within the project directory.
project_root:- Root directory of the whole project. Current assumed to always be the parent directory of
pimlico_root.
output_dir:- Path to output dir (usually
outputin Pimlico root).
home:- Running user’s home directory (on Unix and Windows, see Python’s
os.path.expanduser()).
test_data_dir:- Directory in Pimlico distribution where test data is stored (
test/datain Pimlico root). Used in test pipelines, which take all their input data from this directory.
For example, to point a parameter to a file located within the project root:
param=%(project_root)s/data/myfile.txt
Directives
Certain special directives are processed when reading config files. They are lines that begin with %%, followed
by the directive name and any arguments.
variant:Allows a line to be included only when loading a particular variant of a pipeline. For more detail on pipeline variants, see Pipeline variants.
The variant name is specified as part of the directive in the form:
variant:variant_name. You may include the line in more than one variant by specifying multiple names, separated by commas (and no spaces). You can use the default variant “main”, so that the line will be left out of other variants. The rest of the line, after the directive and variant name(s) is the content that will be included in those variants.[my_module] type=path.to.module %%variant:main size=52 %%variant:smaller size=7
An alternative notation for the variant directive is provided to make config files more readable. Instead of
variant:variant_name, you can write(variant_name). So the above example becomes:[my_module] type=path.to.module %%(main) size=52 %%(smaller) size=7
novariant:A line to be included only when not loading a variant of the pipeline. Equivalent to
variant:main.[my_module] type=path.to.module %%novariant size=52 %%variant:smaller size=7
include:Include the entire contents of another file. The filename, specified relative to the config file in which the directive is found, is given after a space.
abstract:Marks a config file as being abstract. This means that Pimlico will not allow it to be loaded as a top-level config file, but only allow it to be included in another config file.
copy:Copies all config settings from another module, whose name is given as the sole argument. May be used multiple times in the same module and later copies will override earlier. Settings given explicitly in the module’s config override any copied settings.
All parameters are copied, including things like
type. Any parameter can be overridden in the copying module instance. Any parameter can be excluded from the copy by naming it after the module name. Separate multiple exclusions with spaces.The directive even allows you to copy parameters from multiple modules by using the directive multiple times, though this is not very often useful. In this case, the values are copied (and overridden) in the order of the directives.
For example, to reuse all the parameters from
module1inmodule2, only specifying them once:[module1] type=some.module.type input=moduleA param1=56 param2=never param3=0.75 [module2] # Copy all params from module1 %%copy module1 # Override the input module input=moduleB
Multiple parameter values
Sometimes you want to write a whole load of modules that are almost identical, varying in just one or two
parameters. You can give a parameter multiple values by writing them separated by vertical bars (|). The module
definition will be expanded to produce a separate module for each value, with all the other parameters being
identical.
For example, this will produce three module instances, all having the same num_lines parameter, but each with
a different num_chars:
[my_module]
type=module.type.path
num_lines=10
num_chars=3|10|20
You can even do this with multiple parameters of the same module and the expanded modules will cover all combinations of the parameter assignments.
For example:
[my_module]
type=module.type.path
num_lines=10|50|100
num_chars=3|10|20
Tying alternatives
You can change the behaviour of alternative values using the tie_alts option. tie_alts=T will cause
parameters within the same module that have multiple alternatives to be expanded in parallel, rather than
taking the product of the alternative sets. So, if option_a has 5 values and option_b has 5 values, instead
of producing 25 pipeline modules, we’ll only produce 5, matching up each pair of values in their alternatives.
[my_module]
type=module.type.path
tie_alts=T
option_a=1|2|3|4|5
option_b=one|two|three|four|five
If you want to tie together the alternative values on some parameters, but not others, you can specify groups
of parameter names to tie using the tie_alts option. Each group is separated by spaces and the names of
parameters to tie within a group are separated by | s. Any parameters that have alternative values but are
not specified in one of the groups are not tied to anything else.
For example, the following module config will tie together option_a’s alternatives with option_b’s, but
produce all combinations of them with option_c ‘s alternatives, resulting in 3*2=6 versions of the module
(my_module[option_a=1~option_b=one~option_c=x], my_module[option_a=1~option_b=one~option_c=y],
my_module[option_a=2~option_b=two~option_c=x], etc).
[my_module]
type=module.type.path
tie_alts=option_a|option_b
option_a=1|2|3
option_b=one|two|three
option_c=x|y
Using this method, you must give the parameter names in tie_alts exactly as you specify them in the config.
For example, although for a particular module you might be able to specify a certain input (the default)
using the name input or a specific name like input_data, these will not be recognised as being the same
parameter in the process of expanding out the combinations of alternatives.
Naming alternatives
Each module will be given a distinct name, based on the varied parameters. If just one is varied, the names
will be of the form module_name[param_value]. If multiple parameters are varied at once, the names will be
module_name[param_name0=param_value0~param_name1=param_value1~...]. So, the first example above will produce:
my_module[3], my_module[10] and my_module[20]. And the second will produce: my_module[num_lines=10~num_chars=3],
my_module[num_lines=10~num_chars=10], etc.
You can also specify your own identifier for the alternative parameter values, instead of using the values themselves (say, for example, if it’s a long file path). Specify it surrounded by curly braces at the start of the value in the alternatives list. For example:
   [my_module]
   type=module.type.path
   file_path={small}/home/me/data/corpus/small_version|{big}/home/me/data/corpus/big_version
This will result in the modules my_module[small] and my_module[big], instead of using the whole file
path to distinguish them.
An alternative approach to naming the expanded alternatives can be selected using the alt_naming parameter.
The default behaviour described above corresponds to alt_naming=full. If you choose alt_naming=pos, the
alternative parameter settings (using names where available, as above) will be distinguished like positional
arguments, without making explicit what parameter each value corresponds to. This can make for nice concise
names in cases where it’s clear what parameters the values refer to.
If you specify alt_naming=full explicitly, you can also give a further option alt_naming=full(inputnames).
This has the effect of removing the input_ from the start of named inputs. This often makes for
intuitive module names, but is not the default behaviour, since there’s no guarantee that the input name
(without the initial input_) does not clash with an option name.
Another possibility, which is occasionally appropriate, is alt_naming=option(<name>), where <name> is the
name of an option that has alternatives. In this case, the names of the alternatives for the whole module will
be taken directly from the alternative names on that option only. (E.g. specified by {name} or inherited
from a previous module, see below). You may specify multiple option names, separated by commas, and the
corresponding alt names will be separated by ~. If there’s only one option with alternatives, this is equivalent to
alt_naming=pos. If there are multiple, it might often lead to name clashes. The circumstance in which this is
most commonly appropriate is where you use tie_alts=T, so it’s sufficient to distinguish the alternatives by
the name associated with just one option.
Expanding alternatives down the pipeline
If a module takes input from a module that has been expanded into multiple versions for alternative parameter
values, it too will automatically get expanded, as if all the multiple versions of the previous module had
been given as alternative values for the input parameter. For example, the following will result in 3 versions
of my_module (my_module[1], etc) and 3 corresponding versions of my_next_module (my_next_module[1], etc):
[my_module]
type=module.type.path
option_a=1|2|3

[my_next_module]
type=another.module.type.path
input=my_module
Where possible, names given to the alternative parameter values in the first module will be carried through to the next.
Structure: headed sections
By default, a pipeline is ultimately just a list of modules. The status command will show a long
list of all the modules. In some cases, this can get very long and difficult to navigate.
You can add structure to your pipeline by adding section headings. This is done by starting comments with multiple ``#``s. In other words, the headings are part of the comments that come in between modules.
Headings follow Markdown-style formatting (only the
atx-style, not Setext). Since our comments begin with #``s, the first ``# does not denote a
heading. Subsequet ``#``s produce further nested levels of headings.
## Data pre-processing
# In this section, we will pre-process the data.
# Note that the line with a ## at the start is a heading.
# These subsequent ones are not - they are just comments.

### Pre-processing step 1
# This is a sub-section
[my_module]
type=module.type.path
When you run the status command now, you will see the section headings collapsed
by default. You can expand individual sections, or everything, using the command’s
options.
Use --expand-all (-xa) to expand the full tree of section headings and show all
modules. Use --expand (-x) with a section number (get this from the collapsed tree)
to expand a given section. E.g. ./pimlico.sh myconf.conf status -x 2.3.1. You can
given multiple sections by repeating the -x option.
You can also expand a full subtree of a given section by ending the section number with a dot.
./pimlico.sh myconf.conf status -x 2.3..
Module variables: passing information through the pipeline
When a pipeline is read in, each module instance has a set of module variables associated with it. In your config file, you may specify assignments to the variables for a particular module. Each module inherits all of the variable assignments from modules that it receives its inputs from.
The main reason for having module variables it to be able to do things in later modules that depend on what path through the pipeline an input came from. Once you have defined the sequence of processing steps that pass module variables through the pipeline, apply mappings to them, etc, you can use them in the parameters passed into modules.
Basic assignment
Module variables are set by including parameters in a module’s config of the form modvar_<name> = <value>. This
will assign value to the variable name for this module. The simplest form of assignment is just a string literal,
enclosed in double quotes:
[my_module]
type=module.type.path
modvar_myvar = "Value of my variable"
Names of alternatives
Say we have a simple pipeline that has a single source
of data, with different versions of the dataset for different languages (English and Swedish).
A series of modules process each language
in an identical way and, at the end, outputs from all languages are collected by a single summary module.
This final
module may need to know what language each of its incoming datasets represents, so that it can output something
that we can understand.
The two languages are given as alternative values for a parameter path, and the whole pipeline gets
automatically expanded into two paths for the two alternatives:
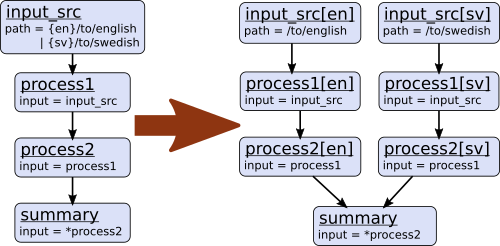
The summary module gets its two inputs for the two different languages as a multiple-input: this means we could
expand this pipeline to as many languages as we want, just by adding to the input_src module’s path parameter.
However, as far as summary is concerned, this is just a list of datasets – it doesn’t know that one of them is
English and one is Swedish. But let’s say we want it to output a table of results. We’re going to need some labels
to identify the languages.
The solution is to add a module variable to the first module that takes different values when it gets expanded
into two modules. For this, we can use the altname function in a modvar assignment: this assigns the name of
the expanded module’s alternative for a given parameter that has alternatives in the config.
[input_src]
path={en}/to/english | {sv}/to/swedish
modvar_lang=altname(path)
Now the expanded module input_src[en] will have the module variable lang="en" and the Swedish version lang="sv".
This value gets passed from module to module down the two paths in the pipeline.
Other assignment syntax
A further function map allows you to apply a mapping to a value, rather like a Python dictionary lookup. Its
first argument is the value to be mapped (or anything that expands to a value, using modvar assignment syntax).
The second is the mapping. This is simply a space-separated list of source-target mappings of the form
source -> target. Typically both the sources and targets will be string literals.
Now we can give our languages legible names. (Here we’re splitting the definition over multiple indented lines, as permitted by config file syntax, which makes the mapping easier to read.)
[input_src]
path={en}/to/english | {sv}/to/swedish
modvar_lang=map(
    altname(path),
    "en" -> "English"
    "sv" -> "Svenska")
The assignments may also reference variable names, including those previously assigned to in the same module and those received from the input modules.
[input_src]
path={en}/to/english | {sv}/to/swedish
modvar_lang=altname(path)
modvar_lang_name=map(
    lang,
    "en" -> "English"
    "sv" -> "Svenska")
If a module gets two values for the same variable from multiple inputs, the first value will simply be overridden
by the second. Sometimes it’s useful to map module variables from specific inputs to different modvar names.
For example, if we’re combining two different languages, we might need to keep track of what the two languages
we combined were. We can do this using the notation input_name.var_name, which refers to the value of module
variable var_name that was received from input input_name.
[input_src]
path={en}/to/english | {sv}/to/swedish
modvar_lang=altname(path)

[combiner]
type=my.language.combiner
input_lang_a=lang_data
input_lang_b=lang_data
modvar_first_lang=lang_a.lang
modvar_second_lang=lang_b.lang
If a module inherits multiple values for the same variable from the same input (i.e. a multiple-input),
they are all kept and treated as a list. The most common way to then use the values is via the join function.
Like Python’s string.join, this turns a list into a single string by joining the values with a given separator
string. Use join(sep, list) to join the values coming from some list modvar list on the separator sep.
You can get the number of values in a list modvar using len(list), which works just like Python’s len().
Use in module parameters
To make something in a module’s execution dependent on its module variables, you can insert them into module parameters.
For example, say we want one of the module’s parameters to make use of the lang variable we defined above:
[input_src]
path={en}/to/english | {sv}/to/swedish
modvar_lang=altname(path)
some_param=$(lang)
Note the difference to other variable substitutions, which use the %(varname)s notation. For modvars, we
use the notation $(varname).
We can also put the value in the middle of other text:
[input_src]
path={en}/to/english | {sv}/to/swedish
modvar_lang=altname(path)
some_param=myval-$(lang)-continues
The modvar processing to compute a particular module’s set of variable assignments is performed before the substitution. This means that you can do any modvar processing specific to the module instance, in the various ways defined above, and use the resulting value in other parameters. For example:
[input_src]
path={en}/to/english | {sv}/to/swedish
modvar_lang=altname(path)
modvar_mapped_lang=map(lang,
      "en" -> "eng"
      "sv" -> "swe"
   )
some_param=$(mapped_lang)
You can also place in the $(...) construct any of the variable processing operations shown above for assignments
to module variables. This is a little more concise than first assigning values to modvars, if you don’t need
to use the variables again anywhere else. For example:
[input_src]
path={en}/to/english | {sv}/to/swedish
some_param=$(map(altname(path)),
      "en" -> "eng"
      "sv" -> "swe"
   ))
Usage in module code
A module’s executor can also retrieve the values assigned to module variables from the module_variables
attribute of the module-info associated with the input dataset. Sometimes this can be useful when you are
writing your own module code, though the above usage to pass values from (or dependent on) module variables
into module parameters is more flexible, so should generally be preferred.
# Code in executor
# This is a MultipleInput-type input, so we get a list of datasets
datasets = self.info.get_input()
for d in datasets:
    language = d.module.module_variables["lang"]